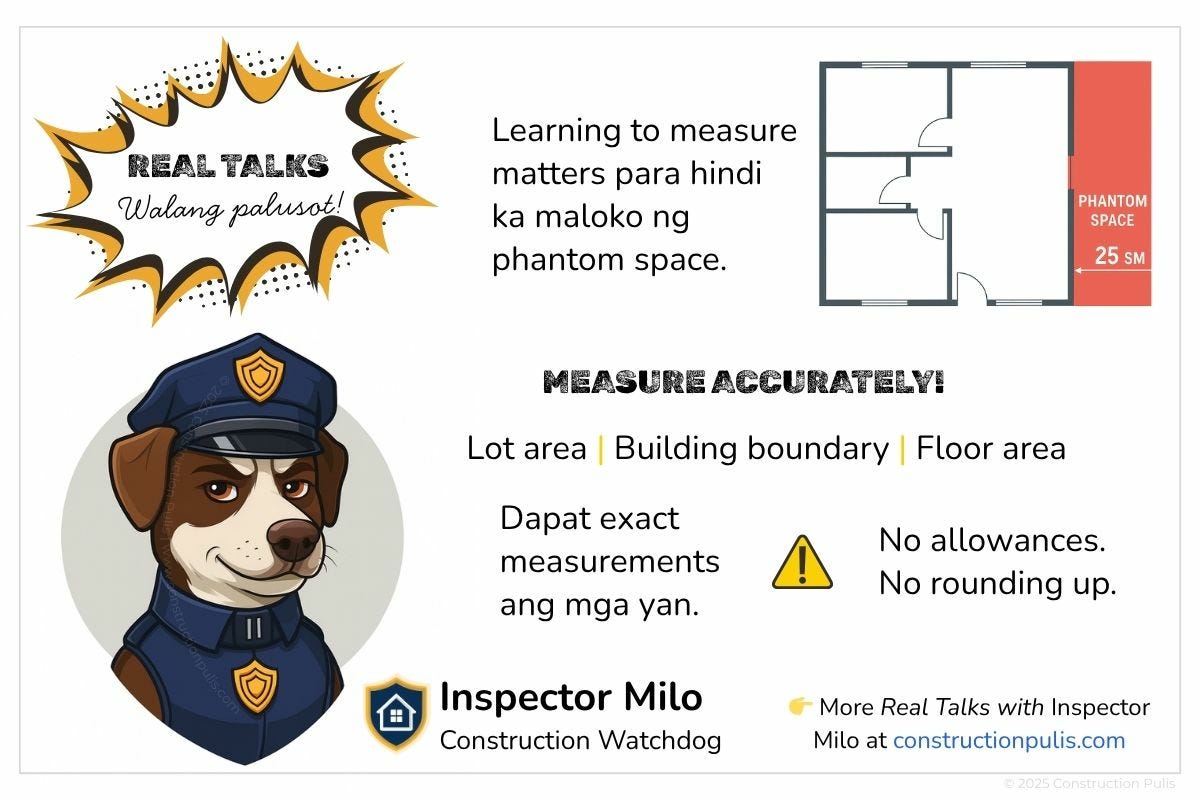
The Number That Multiplies Everything: Why Scammers Start With Floor Area
How to Spot Phantom Square Meters and Verify Floor Area Yourself
Construction is all about numbers, and the system itself is honest. It calculates materials and labor based on whatever measurements you provide. But when a dishonest builder manipulates those numbers from the start, everything that follows is inflated.
If an actual space is 60 square meters, then the BOQ calculates materials and labor for that area. Change that to 85, and everything multiplies from it.
Suddenly, you’re paying for 25 square meters of tiles that don’t exist, 25 square meters of paint that don’t exist, 25 square meters of sand, of wires… The phantom space gets charged over and over for every material in the BOQ.
So scammers manipulate the floor area first.
In This Dispatch:
What Square Meters Actually Mean
A square meter is the area of a square that’s one meter long on each side. Think of it like floor tiles. If you have a tile that’s 1 meter × 1 meter, that’s 1 square meter.
Width vs. Length:
For a square space (like that 1m × 1m tile), all sides are equal. Length = Width = 1 meter.
For a rectangular space (most rooms):
Length = the longer side
Width = the shorter side
To get square meters: multiply length × width
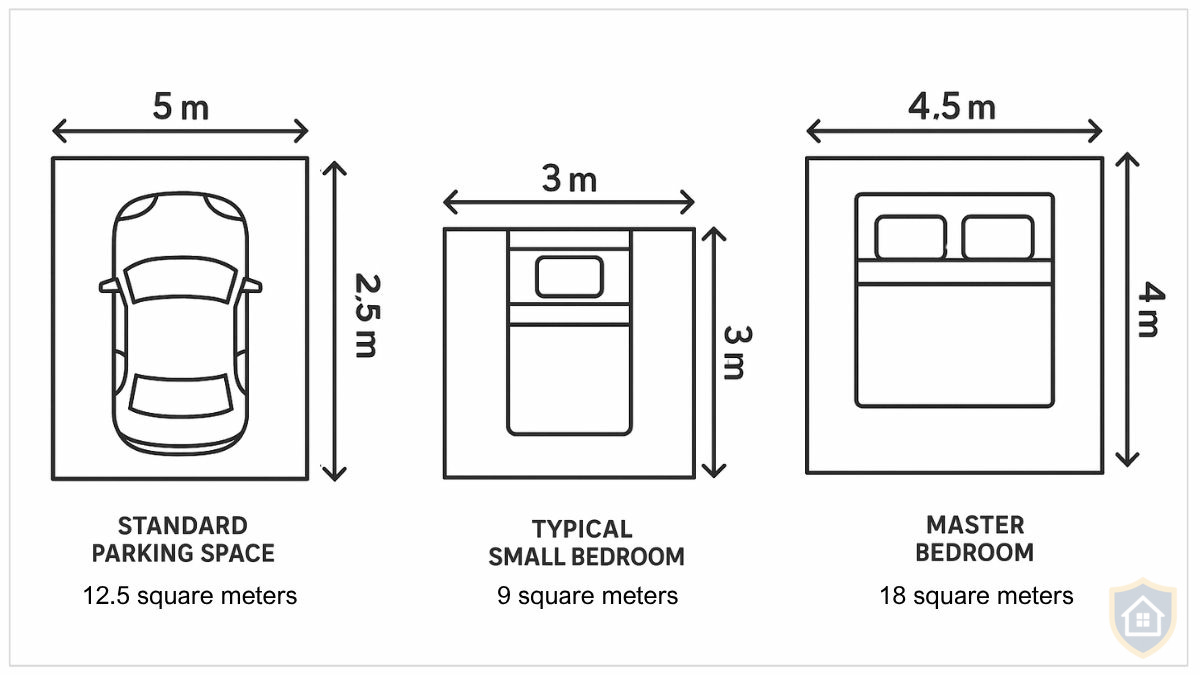
Here are some real-life comparisons so you know what you’re working with:
The Two-Floor Plan Tactics
I wrote in my Open Letter (The Truth Unravels) that the engineer’s strategic placement of numbers on the floor plan to hide his deception was for another story. This Dispatch is for that.
He used two tactics together to hide the phantom square meters.
Tactic 1: The Building Boundary vs. Floor Area Switch
What every homeowner needs to remember: lot area and floor area are never the same thing.
Lot area = your entire property boundary, end-to-end. This includes yards, setbacks, open spaces, and areas outside your house.
Floor area = the enclosed living space inside your house. The actual rooms that get painted, tiled, and finished.
When preparing a BOQ, builders calculate based on floor area. Because that’s what gets built and finished. You don’t tile your yard. You don’t paint empty air outside your walls. The materials and labor in a BOQ are for the enclosed spaces.
Every builder knows this. BOQs are prepared based on floor area, not lot area.
Yet there’s a measurement between the lot area and floor area that scammers love to use: the building boundary.
Building boundary = the full footprint where a building sits on a lot.
So what did our engineer do?
He measured the building boundary and used that as the floor area in the BOQ.
Our Blue Building’s boundary is smaller than our entire lot. Our lot includes our old house and yard, but the fraud happened specifically in how the engineer measured the building’s footprint.
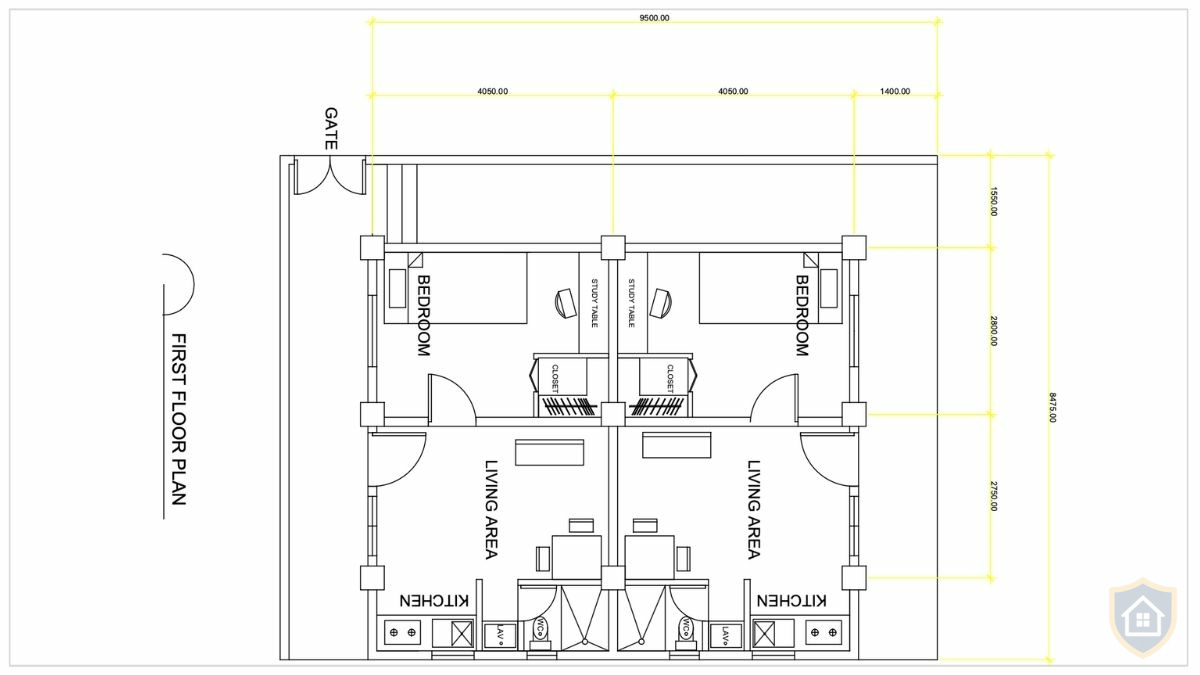
Look at the first floor plan. The topmost numbers show: 9.5 m (length) and 8.475 m (width). These are the building boundary measurements, excluding the gate area, according to the engineer’s plan.
But that’s NOT the floor area.
So, to calculate the floor area, let’s use the engineer’s numbers. To make it easier to follow, I used meters (m) for all calculations here. For the drawing, the engineer used millimeters (mm). To convert mm to m, divide by 1,000.
(Note: These numbers were already manipulated, but we’ll use them here to show you how to calculate and what to check. Even with his tampered measurements, the fraud becomes visible.)
Step 1: Find the missing width measurement
The top-most number showed the width of the first floor area: 8.475 m
Showed the numbers below where he got that number, but with a missing measurement: 1.55 + 2.8 + 2.75 = 7.1 m
So to get the missing measurement: 8.475 - 7.1= 1.375 m
Step 2: Calculate the actual floor area width
The 1.55 m is outside the house (not floor area), so we drop it
Floor area width: 1.375 + 2.75 + 2.8 = 6.925 m
Step 3: Calculate the floor area length
He showed all measurements on the length side this time (except the gate area)
The 1.4 m is outside the house, so we drop it, too
Floor area length: 4.05 + 4.05 = 8.1 m
Step 4: Calculate square meters
Floor area: 8.1 m (length) × 6.925 m (width) = 56.09 square meters
That’s almost identical to our real first-floor area on site: 59.5 square meters ✓
8.5 m (length) x 7 m (width) = 59.5 square meters
But what did the engineer calculate?
Building boundary: 9.5 m (length) × 8.475 m (width) = 80.51 square meters.
He then declared this as the floor area and rounded it up to 85 square meters.
Inflating the first floor would mean inflating the second floor, since the first floor is clearly smaller. He had to come up with another tactic to make the second floor 20 square meters larger.
Tactic 2: The Extension Padding
So, how did he add 20 square meters to the second floor to get his declared 105 square meters?
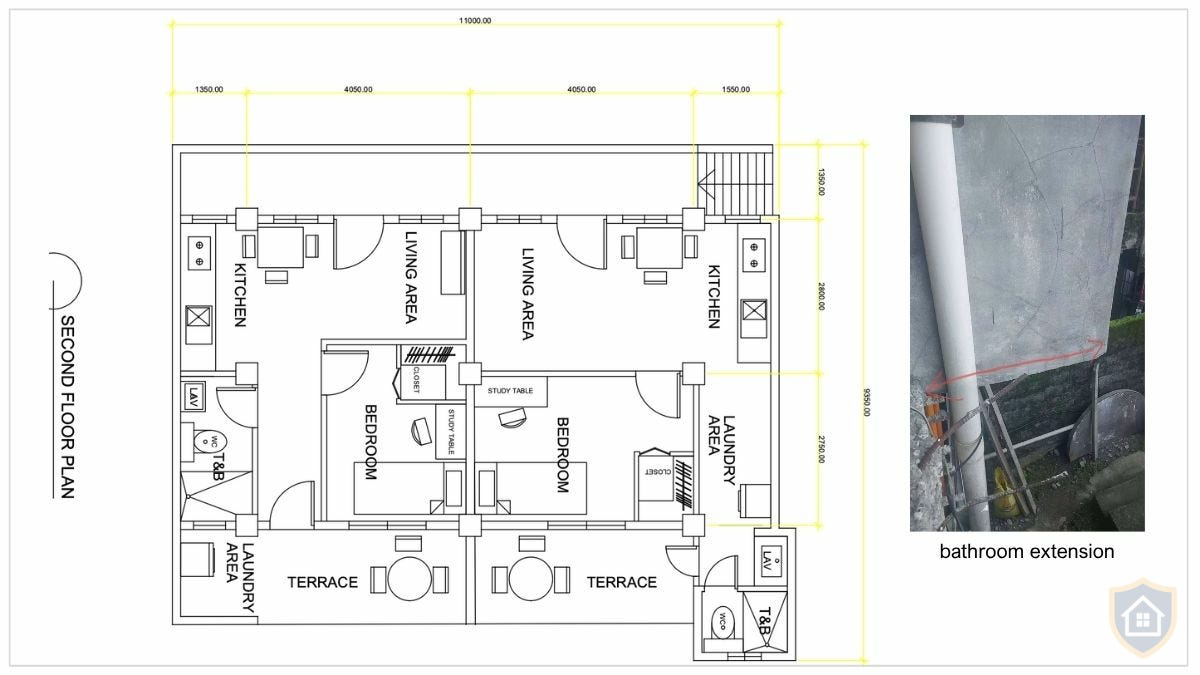
One unit on the second floor has a bathroom extension. It sticks out about 0.584 m from the main building, toward our own property, where the old house stands. You can see it in the photo—that little bump where the bathroom is.
Only one unit has this extension. The other unit is flush with the building line.
He inflated the 0.584 m extension to 0.875 m.
Take the second floor’s topmost measurement (9.35 m width) minus the first floor’s end-to-end (8.475 m width).
The result is 9.35 - 8.475 = 0.875 m. But our bathroom extension is only 0.584 m.
Instead of writing the width as 8.475 m (based on his first-floor width) and measuring the bathroom separately, he used 9.35 m as the width for the whole building.
Only the bathroom extension should have the additional width of 0.584 m (actual).
Different Configurations: If a house is a perfect square or rectangle, measuring is straightforward. But if it has different configurations, a diligent, honest professional would not mind the extra work of measuring each space separately to get more accurate results. To a lazy, dishonest professional, expect the opposite.
For the length, he showed all the measurements but manipulated them to come up with 11 meters, then multiplied that by the padded width.
11 m (length) × 9.35 m (width) = 102.85 square meters, and he rounded that to 105.
Actual/Real: 10.5 m (length) x 8 m (width) = 84 square meters (excluding bathroom extension, which should be measured separately).
If you’ve noticed, his 85 sqm first-floor claim (allegedly excluding the gate) is almost the same as the actual second-floor area of 84 sqm. Since the second floor is already “sagad”—maximized with no setbacks, overhangs on all sides—that 84 sqm essentially represents the entire building footprint, gate area included.
So, his 105-square-meter second floor is either a house floating in the air or one with angry neighbors and a barangay case for crossing the property line.
Our engineer treated the two floors as completely separate houses, assigning whatever numbers fit his deception, even when they defied basic math and physics.
Kapwa Homeowners, it’s our duty to know how to measure and calculate the lot area, the building boundary, and the floor area ourselves, for we never know who we’re working with. Still not convinced? Read on.
The Impact of Wrong Floor Area Measurement
Now that you understand how the fraud works, let me show you exactly what it costs in pesos.
Let’s use the per-square-meter rough estimate to see its impact. Standard finishes usually range from ₱15,000 to ₱25,000 per square meter, while higher-end or “luxury” finishes range from ₱30,000 to ₱40,000 in the Philippines.
Note: This applies to houses built from scratch.
A 60-square-meter house at ₱25,000 per sqm = ₱1.5M. But if it’s inflated to 85 square meters, you’re paying an extra ₱625,000 for nothing. That’s 35% inflation.
Some scammers try to be subtle, inflating measurements by just 5-10% hoping you won’t notice. But even those “small” percentages aren’t small. 5% inflation means ₱75,000 in losses. At 10%? ₱150,000. That’s money that should have gone to your windows or cabinets.
At ₱40,000 per square meter = ₱2.4M, that’s a whopping ₱1 million loss at 35% and ₱120,000-240,000 at 5-10%. Shocking! The higher the finish you want, the higher their take on a deceptive floor area measurement.
For our Blue Building, it’s complicated because we already have the structure in place. The structural work, with a larger initial investment, is complete, and the finishing phase should have a modest budget since we’re not after high-end interiors. It’s for rent.
So, what I did was divide the total construction cost by his declared 85 square meters to get a “per-square-meter rate,” then multiply that rate by the actual 59.5 square meters. The result was within my estimated losses.
But I know I’m not seeing the whole picture because he inflated materials and labor at different rates.
Important: The per-square-meter rate engineers or contractors quote for new builds is only a rough estimate based on the finish you want. Always ask for a complete BOQ that shows the set rate.
How to Verify Your Floor Plan Right Now
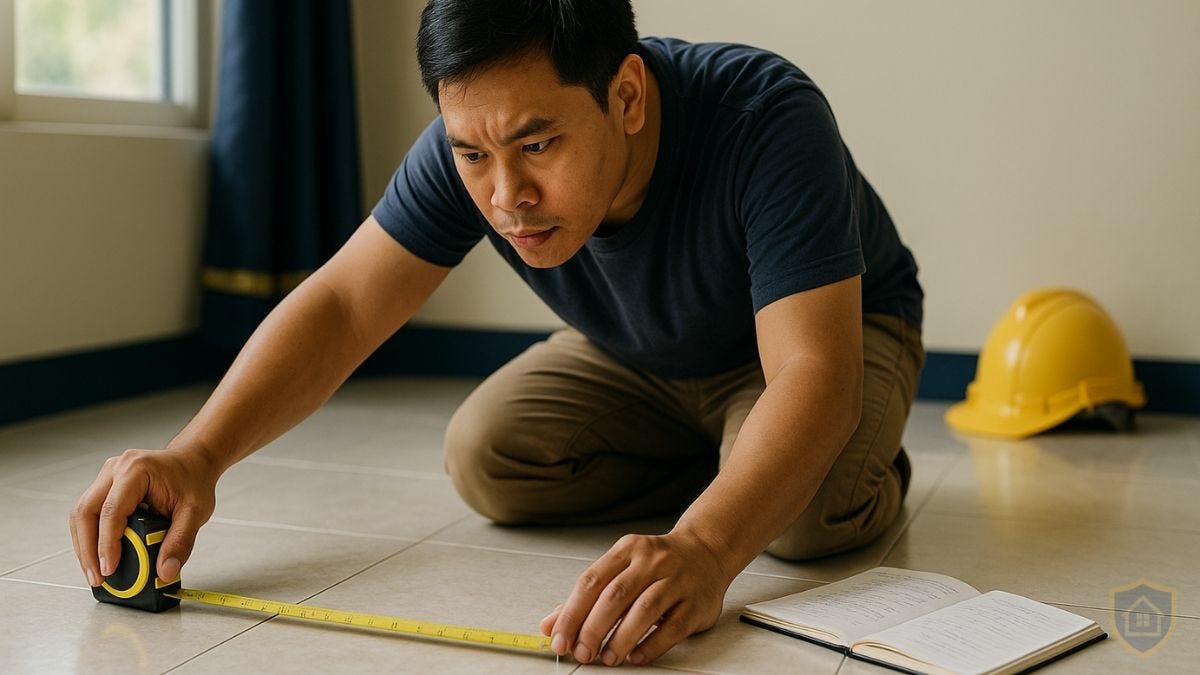
You just need a tape measure and basic math.
Step 1: Get a tape measure (at least 5 meters long)
If you’re buying one, get a metal tape measure, not fabric. They’re more accurate and easier to use.
Step 2: Measure each room’s length and width
For rectangular rooms, measure the longest wall (length) and the shortest wall (width). Write down both numbers.
For odd-shaped rooms, break them into rectangles first. Then measure the length and width of each rectangular section separately. Write down all measurements.
Step 3: Calculate the area
For rectangular rooms: Multiply length × width. That’s your square meters.
A room that’s 4 meters long and 3 meters wide = 4 × 3 = 12 square meters.
For odd-shaped rooms: Multiply length × width for EACH section, then add all the sections together. That’s your total square meters for that room.
Step 4: Add up all the rooms
Total all your room areas. That’s your floor area. Compare it to what the BOQ says.
If there’s a big difference (more than 5-10%), ask why.
Be careful with these deflections and how to respond:
Deflection 1: “Oh, we add allowances.”
Your response: “Allowances apply to materials, not measurements. What’s the exact floor area?”
Deflection 2: “It’s standard practice to round up.”
Your response: “Standard practice is exact measurements. Not even 1% added.”
At first, I’d easily say our house is 60 square meters, rounding up from 59.5. But even that 0.5 difference can throw off material quantities and other cost estimates.
And this is the more critical problem: rounding up measurements affects the structure’s safety and integrity.
Measurements should be exact. Period.
Also, if we had a blueprint in the first place, we would have planned for a clean 60 square meters, not this awkward 59.5 or 84 for the second floor. But since we built first and measured later, we’re stuck with whatever we have. Juan and Pedro’s Houses: Which One Are You Building?
Step 5: Check the ceiling area too
Ceiling area should be almost the same as the floor area, slightly more if there are overhangs, or somewhat less if there are areas without ceilings.
If your floor area is 60 square meters, your ceiling shouldn’t be 120 square meters. That’s a red flag.
Our ceiling didn’t just experience measurement inflation but also material substitution without consultation. That’s for another Dispatch, coming soon.
Red Flags to Watch For
If you see any of these red flags, ask questions.
Missing dimensions on the floor plan - Are all measurements shown, or are some sections unlabeled?
Ask: “Engineer, bakit may mga missing numbers po dito? Pakilagay po lahat ng measurements.”
Math that doesn’t add up - When you calculate the measurements yourself, does it match the total they claim?
Ask: “Engineer, ang floor area po namin ay 60 square meters, pero bakit sabi niyo po 85? Sinali nyo po ba yung building boundary?”Extensions applied to the entire building - Are there extensions on one side that get measured as if the whole building has them?
Ask: “Engineer, ang extension lang po ay sa isang banda, pero bakit po parang may extension na lahat ng corners?”Identical measurements for different-sized floors - Do floors that are obviously different sizes have the same measurements in the BOQ?
Ask: “Engineer, bakit pare-pareho ang measurements nila e, iba-iba po ang configurations ng bawat floor?”Ceiling area way larger than floor area - Is the ceiling measurement significantly bigger than the floor area?
Ask: “Engineer, parang Sistine Chapel po ba ang gagawing ceiling, kaya doble ang measurement?”Hesitation when you ask to verify - Do they resist when you want to measure things yourself or check their math?
Nothing to ask. Their resistance says it all.
If you can’t physically measure yet because construction hasn’t started, at least verify the math on the floor plan. Use a calculator. Check if the dimensions they show actually add up to the total they claim.
And when they start laying the foundation, be there or ask someone you trust to check the measurements. The earlier you confirm things, the lower your losses will be, if any.
Learning to Measure Matters
Learning to measure matters. Not because we should distrust everyone, but because verification protects us from those who would take advantage.
We need to understand that when the floor area is wrong, EVERYTHING is affected. A 60-square-meter space is 60, no more, no less.
Make sure that your floor area is real.
Take Action
Ready to verify your floor area? Use Checklist #1: Floor Area Verification to measure your space yourself.
Want to spot red flags fast? Check Alert #1: Floor Area Fraud Tactics for warning signs to watch for.
Disclaimer: Kapwa Homeowner is not a licensed engineer, architect, or construction professional. The information shared on Construction Pulis is for educational purposes only and should not replace professional advice. Every construction project is unique, so always consult licensed professionals for your specific situation.


